|
Our skin and our bodies are very sensitive to changes in stress levels, routine, exercise, eating habits and even a change in seasons. Sound familiar? Normally we only have to deal with one or two of these issues at a time, but lockdown has thrown them all at us at once. I don’t know about you, but I’m finding my skin is oily in areas, dehydrated in others and I’m getting painful breakouts as well. I felt it needed a bit of TLC and when I thought about it, I realised that a lot of you may be having similar issues, so I decided to share my mini facial with you. Naturally I used all Dermalogica products not only because they are what we use in the salon but because they are the first range I have used on my skin that actually does what it says and my skin has never been better. Even now, with my COVID breakout, it is not half as bad as it was in before I started using the products. Below is a breakdown of the steps to a mini facial and I will explain about the products I used and why. I didn’t use an SPF because I incorporated my evening routine into the facial, but I will go through the step with you anyway.
Steps: 1. Pre-cleanse It’s important to always double cleanse. The first cleanse will remove any excess oils and makeup from the skin to allow your cleanser to really get in and do it’s job during the second cleanse. I used Dermalogica’s Precleanse Balm but it is also available in an oil form. Precleanse is designed to remove stubborn oils, makeup and environmental pollutants from the skin and it also helps to lock in moisture. It is amazing at removing waterproof makeup and is safe to use around the eye area though don’t use too much, a little really does go a long way and you will be forced to clean the excess out of your eyes if you do. 2. Cleanse Many people overlook the importance of a cleanser. A good cleanser that is targeted towards your skins needs can greatly enhance the effect your skincare routine. My skin was in need of rebalancing and I had recently bought the new Dermalogica Active Clay Cleanser which was perfect for the job. Active Clay Cleanser is formulated to absorb excess oils while protecting the skins natural lipid barrier which means the skin won’t have that tight, dry feeling that is associated with some oil absorbing cleansers. It smells divine too! 3. Exfoliate Exfoliation removes old, dead skin cells from the surface of our skin, exposing a smooth, fresh layer underneath. I used Dermalogica Multivitamin Thermafolient which is extremely popular as it combines both manual and chemical exfoliants with anti-aging ingredients. You will see immediate smoothing results with the manual exfoliant and the chemical exfoliant gives a longer lasting result. It will give your skin a fresher, smoother look. 4. Masque The masque stage is where you can effectively boost your treatment while really pampering yourself. It’s the one product that many of us will have numerous tubes of, each to address different skin concerns. Be sure whatever masque you choose is going to address whatever skin concern you need help with at the moment. For this facial I went with the Dermalogica Sebum Clearing Masque. It helps to clear breakouts while helping to prevent future ones and also has a lovely cooling effect on the skin. This is a ten minute masque allowing you enough time to relax and put your feet up with a quick cuppa. 5. Toner Toner is another often overlooked product that has been somewhat demonised in todays market. I often have clients tell me that they don’t use toner because it dries out their skin. This is a sign that the toner in question has far too much alcohol in it. A good toner is designed to enhance your skin, not worsen it, and should help prep your skin to enhance moisture absorption. I use Dermalogica’s Multi Active Toner. It’s light and refreshing and is packed with humectants which draw moisture to the skin. It is also in a handy spray bottle, like most of the Dermalogica toners and I even carry a travel size one in my handbag to give myself a refreshing spritz on a hot day. 6. Eye Cream Eye creams and eye serums are specially formulated to treat the delicate eye area. They are an important part of any skincare routine because the molecules in your face cream are too large to penetrate through the thinner, more delicate skin of the eye area and are incapable of addressing the issues associated with it. Today I used the new Biolumin-c eye serum which is fantastic for brightening dark circles and firming the eye area. An eye cream should always be applied using your ring finger, as it is the weakest finger on your hand, you will be less likely to add too much pressure to the area and drag at the delicate skin. 7. Serum Serums are my favourite part of my daily routine. They are designed to address specific skin concerns and are very effective. They are usually highly concentrated so you only need to use a little and you can often patchwork them and only use them on specific areas if needed. They must be sealed in under a moisturiser. My chosen serum is the Age Bright Clearing Serum. It was released within the last year because Dermalogica realised they had no product in their range that targeted both breakouts and ageing in one. It is very good at taking the inflammation out of a breakout and leaves your skin feeling soft and velvety. It pairs extremely well with Age Bright Spot Fader which can help reduce the appearance of new acne pigmentation and scarring. 8. Moisturiser As this was my evening skin routine, I used my night cream which is Dermalogica Sound Sleep Cocoon. Our skins optimum recovery time is at night and this gel based cream helps to aid this, improving and brightening the skin tone. It also has encapsulated Lavender which helps you have a restful nights sleep and in turn boosts skins radiance. I often find it hard to get to sleep and this cream has literally changed my life! 9. SPF SPF is the single most important product you can use to combat skin aging. It should be an essential part of your morning routine whether the sun is shining or it is overcast and raining. The suns rays can penetrate and affect your skin even through the clouds causing pigmentation and fine lines. Many moisturisers have SPF in them but it is important to also top up your SPF throughout the day which is often forgotten. I use Prisma Protect SPF 30 in the morning, which is a moisturiser and SPF combo and I use Invisible Physical Defence SPF 30, which is solely an SPF, for topping up as I don’t like to waste my moisturiser for this. I really hope this and my video helps you to do a mini facial at home and give yourself a well deserved treat and some TLC. If you need any help in personalising your home facial or if you are in need of new products please don’t hesitate to contact us, we will be happy to help. We do have some products available on our website and if we don’t have what you need we will give you a code to use on the Dermalogica website which will ensure you get a free gift. Please continue to stay safe as we can’t wait to see you all back in the salon when we return.
0 Comments
Meet our gorgeous Stephanie. She has the most envied brows in the salon. You just love them and we know this because you keep telling us.
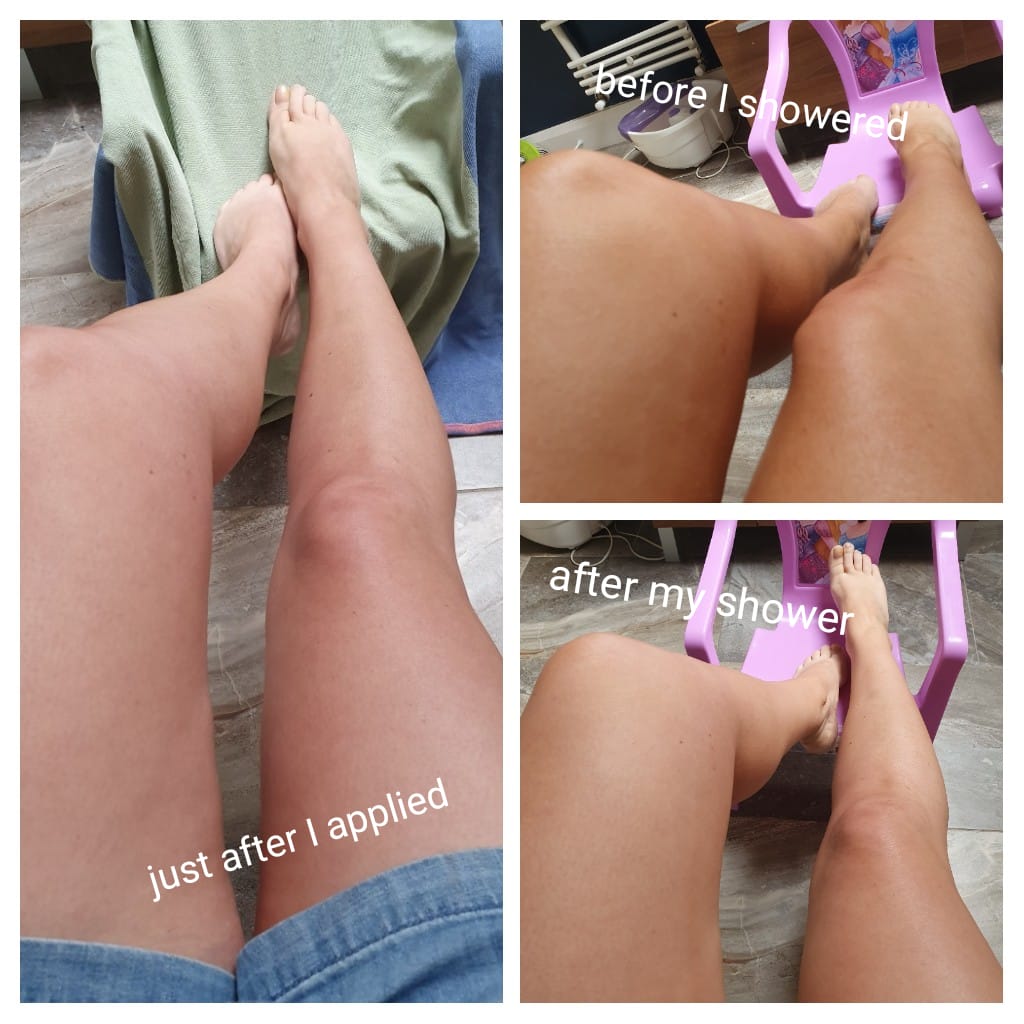
Stephanie is sharing her daily routine for defined brows with all of you. Isn't it just lovely to see her again. She has asked me to stress that she hasn't fully groomed and tinted her brows, that is a job for next week. But we think they look absolutely amazing. Myself and Caitriona will definitely be practicing this. We hope you are all well and staying safe, keep watching out for more videos coming soon xx Our lovely Michelle is madly in love with Cocktail Spray Tan Can, and she wanted to share with all of you her tips for a great even application at home. No need not to look fabulous in lockdown! We love the cameo from little Lucy too, I'm sure all the Mammies have similar going on at the moment. We also have some advice on prepping your skin before tanning and how to look after your tan once it has developed: Before Tanning
After Tanning
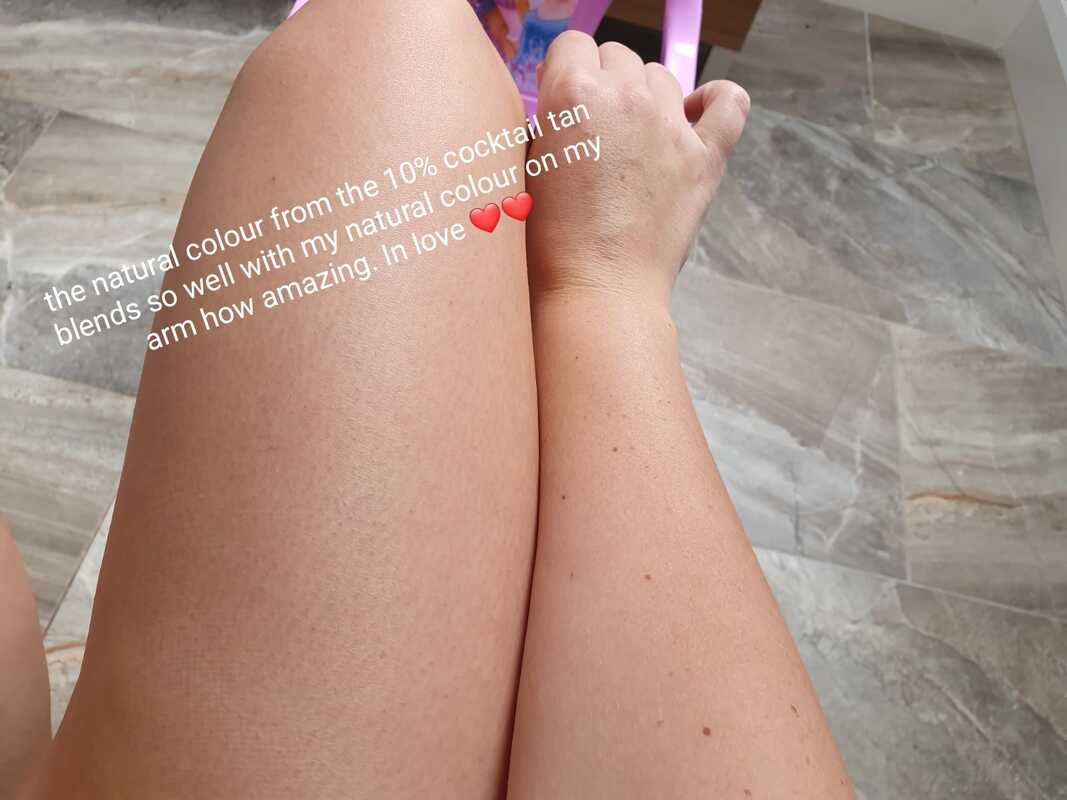
We have Michelle's favourite Tan in Medium (10%), as well as the Extra Dark (14%) and Tan Remover available on our brand new online store, just click on the menu bar above. We will be adding lots more products over the next few days. Meanwhile enjoy Michelle's video and we will update with her after pics xx Blog Update:Here are the after pics of Michelle's tan once it developed and she had a shower. It looks so natural and blends so well with the natural colour she has picked up on the top of her body in the recent good weather. Great job Michelle xx
Hi Everyone
We hope everyone is keeping well and safe. We are delighted to kick off our blog posts with a quick brow shaping tutorial for a natural brow. This is not intended for super definition or the HD brow look but to help you get to grips with putting a shape on your natural brows. Caitriona kindly volunteered to let her brows grow out for the purposes of the video. It is our very first, so excuse the camera work, we will hopefully get better as we go! Before you begin make sure you have the correct tools:- a good tweezers (we love Tweezerman), a mirror, a home tint kit if you want to add definition (make sure to patch test and mix according to manufacturers’ instructions), a disposable mascara wand, some cotton buds, damp cotton wool and an eyebrow pencil or thin make-up brush. Brow Shaping Steps: 1. Cleansing - Make sure to thoroughly cleanse the brow area. This will remove any make-up or product build up, as well as free any loose hairs and any dry skin sitting in the brow. 2. Plan - Next have a really good look in the mirror at your brows and the shape of your brow bone, to get an idea of the shape that will suit your face, be honest with yourself. 3. Quick Note - Do not forget that brows are not identical, they are sisters not twins. It is ok if there is a slight variation with how they look. You can do a complete re-shape or just remove a few hairs to tidy up. 4. Measuring Brows - Measure your brows correctly using the brow pencil or thin make-up brush. Don’t worry about all the complicated brow mapping videos you have seen on YouTube etc, we just want a simple, and basic measurement.
5. Tinting Brows - An optional step you can include is a brow tint, which will add definition to the brows. No matter what colour your brows are the root and tip are usually transparent so adding even a light tint can quickly make them look more filled out. Home tinting kits can be bought at most pharmacies but it is extremely important that you carry out a patch test and mix the tint according to manufacturer’s instructions. Only buy a brown tint for brows, never black unless you have raven coloured hair. Light brown for fair hairs and dark brown for darker hair. Brows are a different type of hair to lashes, they take tint much faster and lose it quicker. If this is your first time and you are unsure of the colour you want to achieve you can layer the tint by applying and removing within about 30 seconds. Leave it for about 30 seconds to see how it is developing and then re-apply another layer. If you leave tint on the brows for too long they will go very, very dark, very, very quickly. Exercise caution. We always tint before we remove hair to prevent tint entering the open hair follicle and causing infection. When applying try to avoid the skin as much as possible, we know this is not easy. Don’t worry if you ‘go outside the lines’, you can tidy up with some cotton buds. 6. Shaping – It’s now time to shape, don’t be afraid! If you take a really close look at your brows you may notice that they grow in lines which can easily be followed. When you begin to shape do not forget to sit back every so often and check your work from a little distance. Some times when you are too close you can have a tendency to just see lots of hairs that need to be gone and when you sit back, you have half a brow! Go slowly. Stretch the skin and pluck in the direction of hair growth. If you are a little sensitive to pain, numb the area with a little ice beforehand. However, a good tweezers will grab the hair properly, even the very finest. A poor quality tweezers will drag hairs and increase any pain. As you get more confident, you can move more quickly. 7. Trimming – Once you have achieved the shape you want you may find you have a few long hairs that just will not sit how you want them to. Using a clean disposable mascara wand, brush hair upwards and trim off any ends that are too long. Please be careful here as it is easy to leave yourself with a hole if you get over-zealous. 8. Finished! – At this point you can leave your brows as is or you can add more definition with a brow pencil or brow shadow and set with a brow gel. If you need any new brow products give us a shout as we can order some of the Evagarden products for you, including their amazing setting gel. Thank you for reading and hopefully this will help you break free of the dreaded Quarantine Brows until we get back to work. Miss you guys and stay safe Caroline & Caitriona xx |
Our Salon TeamOur team have a wealth of experience in the beauty industry, with varied & interesting experiences in their careers that they are excited to share with you. They will provide lots of varied informational posts including skincare, nails, behind the scenes, product information, how to's, and much more. CategoriesAll Beauty Tutorials Nails Salon News Skincare Skin Treatments Sun Safe Archives
October 2022
|
 RSS Feed
Caroline's Beauty Room33 Kenure Park, Rush, Co. Dublin, R864
Phone 083 3073399 Text 083 3073399 email carolinesbr-queries@yahoo.com We aim to respond to all email queries within 48 hours, excluding national holidays. Opening Hours
Sun/Mon: Closed Tues: 10am-5pm Wed: 10am-8pm Thurs: 10am-8pm Fri: 10am-6pm Sat: 10am-3pm |
|
Find Us
|